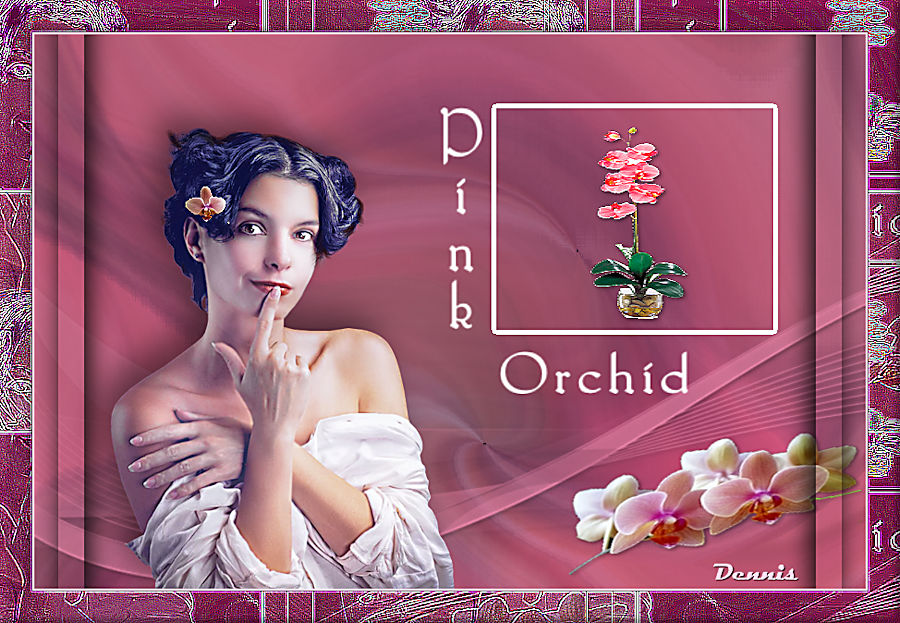
Tutorial Pink Orchid

This tutorial is Translated into English by Dennis
Thank You for Your Beutiful Version of my tutorial
Pink Orchid.
And Thanks for Translating.
Thank You for Your Beutiful Version of my tutorial
Pink Orchid.
And Thanks for Translating.
|
Materials:
|
| ||
This tutorial is written in Paintshop Pro 2020,
but could also be made in other versions
of Paintshop Pro.
***************
Tubes used in this tutorial
are the property of the maker.
Thank you, for the loan of the tube FL13223
and Mask from Narah.
Plugins used:
VM Distortion / It@lian Editors Effect /
Alien Skin Eye Candy 5 Impact,
as well as Jasc Animation Shop.
************
Open a New Raster Layer 950 x 650px
Flood Fill with color #a94d87
Open the tube Brittani-Kilini
Edit / Copy
Edit / Paste as a New Layer
Effect / Image Effects / Seamless Tiling (default)
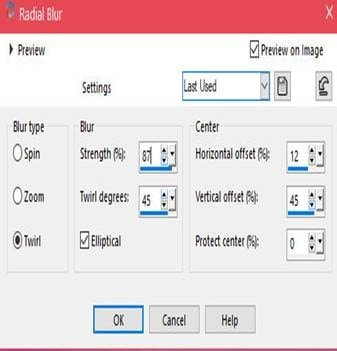
Adjust / Blur/ Radial Blur (with the following settings)
Layers / Duplicate
Image / Mirror / Mirror Vertical
Layers / Properties / Opacity 50
Layers / Merge / Merge Down
Repeat Merge Down so you only have 1 Layer
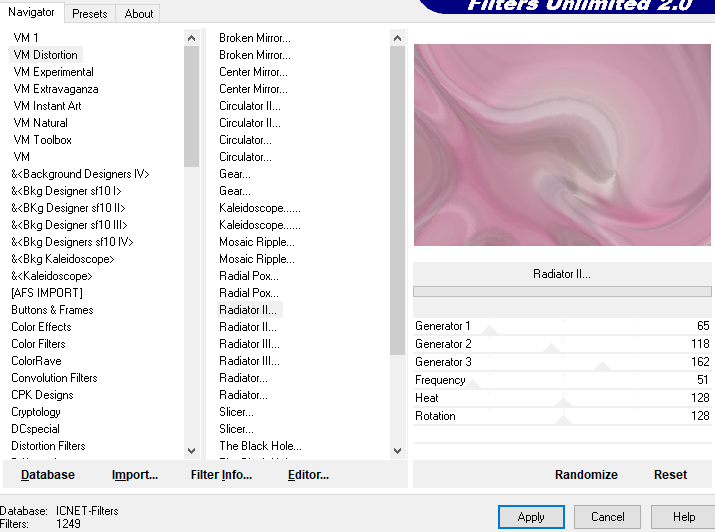
Effects / Plugins / Filters Unlimited 2.0
VM Distortion Radiator II (default)
Image / Mirror / Mirror Vertical
Layers / Properties / Opacity 50
Layers / Merge / Merge Down
Repeat Merge Down so you only have 1 Layer
Effects / Plugins / Filters Unlimited 2.0
VM Distortion Radiator II (default)
Layers /Duplicate
Stay on the Top Layer,
Layers / Properties / Multiply
Layers / Merge / Merge Down
Layers / New Raster Layer
Set the Background Color to #fcc4e9
Flood Fill the Layer with the Background Color
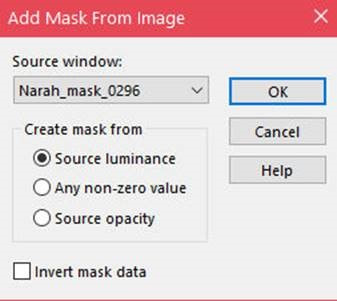
Layers / New Mask Layer from Image
Open the Mask Narah_0296
(with the following settings)
Stay on the Top Layer,
Layers / Properties / Multiply
Layers / Merge / Merge Down
Layers / New Raster Layer
Set the Background Color to #fcc4e9
Flood Fill the Layer with the Background Color
Layers / New Mask Layer from Image
Open the Mask Narah_0296
(with the following settings)
Layers / Merge / Merge Group
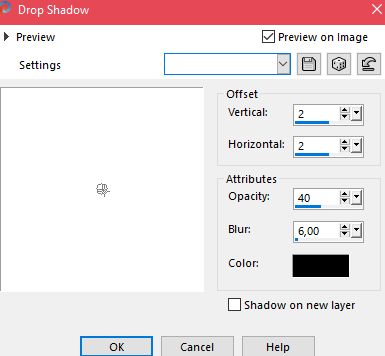
Effects / 3D Effects / Drop Shadow / 2 / 2 / 40 / 6 Black
(with the following settings)
Effects / 3D Effects / Drop Shadow / 2 / 2 / 40 / 6 Black
(with the following settings)

Layers / New Raster Layer
Activate the Selection Tool
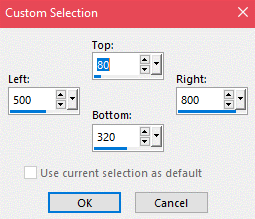
Custom Selection (with the following settings)
Activate the Selection Tool
Custom Selection (with the following settings)
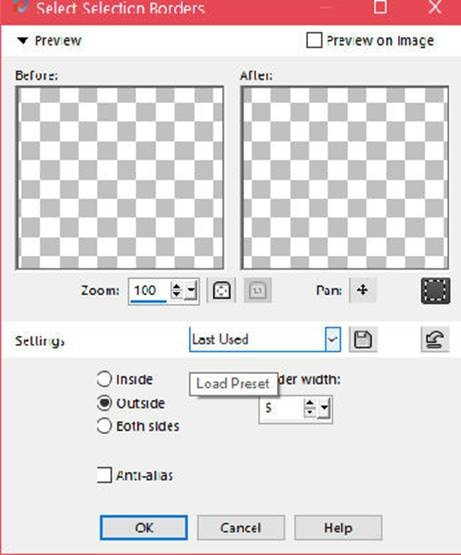
Selections / Modify / Select Selection Borders
Flood Fill the Border with #ffffff
Selections / Select None
Open the Tube Orchid_1_aurora23design
Image / Mirror / Mirror Horizontal
Edit / Copy the tube
Edit / Paste as a New Layer,
Place it down in the Right-Hand corner (see example)
Effects / 3d Effects / Drop Shadow
Selections / Select None
Open the Tube Orchid_1_aurora23design
Image / Mirror / Mirror Horizontal
Edit / Copy the tube
Edit / Paste as a New Layer,
Place it down in the Right-Hand corner (see example)
Effects / 3d Effects / Drop Shadow
Adjust / Sharpness / Sharpen
Open the Tube Orchid-1 again
Image / Mirror / Mirror Horizontal
Put it in place at the other Orchid -1 on the right side
Effects / 3d Effects / Drop Shadow / 2 / 2 / 40 / 6 Black
Adjust / Sharpness / Sharpen
Place as on the Example.
Open the Tube FL13223
Edit / Copy
Edit / Paste as a New Layer
Image / Resize 55%,
Place it in the White Frame
Effects / 3d Effects / Drop Shadow / 2 / 2 / 40 / 6 Black
Adjust / Sharpness / Sharpen
Open the tube element-decor_1 / (make sure you are
on the Top Layer)
Edit / Copy
Edit / Paste as a New Layer
Move it to the left
(See Example)
Layers / Duplicate
Image / Mirror / Mirror Horizontal
Open the Tube -Brittani-Kilini-tubed-by-aurora23design
Edit / Copy
Edit / Paste as a New Layer
Move it to the left
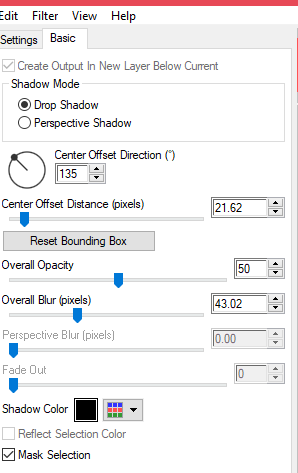
Effects / Image Effects / Plugins Alien Skin Eye Candy 5 / Impact /
Perspective Shadow (default) (see print)
Open the Tube Orchid-1 again
Image / Mirror / Mirror Horizontal
Put it in place at the other Orchid -1 on the right side
Effects / 3d Effects / Drop Shadow / 2 / 2 / 40 / 6 Black
Adjust / Sharpness / Sharpen
Place as on the Example.
Open the Tube FL13223
Edit / Copy
Edit / Paste as a New Layer
Image / Resize 55%,
Place it in the White Frame
Effects / 3d Effects / Drop Shadow / 2 / 2 / 40 / 6 Black
Adjust / Sharpness / Sharpen
Open the tube element-decor_1 / (make sure you are
on the Top Layer)
Edit / Copy
Edit / Paste as a New Layer
Move it to the left
(See Example)
Layers / Duplicate
Image / Mirror / Mirror Horizontal
Open the Tube -Brittani-Kilini-tubed-by-aurora23design
Edit / Copy
Edit / Paste as a New Layer
Move it to the left
Effects / Image Effects / Plugins Alien Skin Eye Candy 5 / Impact /
Perspective Shadow (default) (see print)
Activate the Text Tool
Layers / New Vector Layer
Type Pink Orchid with White #ffffff
with the following Font (Bridgnorth)
(The Font is included in the Zip file with the Materials.
Layers / New Vector Layer
Type Pink Orchid with White #ffffff
with the following Font (Bridgnorth)
(The Font is included in the Zip file with the Materials.

First type Pink
In the Layers Palette /Convert to a Raster Layer.
Push Pink into place so that the top Letter Aligns,
with the Top of the Frame
Then change the direction of the Text
so that the Text is Horizontal
Then Type Orchid / place as Example below
In the Layers Palette /Convert to a Raster Layer.
Push Pink into place so that the top Letter Aligns,
with the Top of the Frame
Then change the direction of the Text
so that the Text is Horizontal
Then Type Orchid / place as Example below
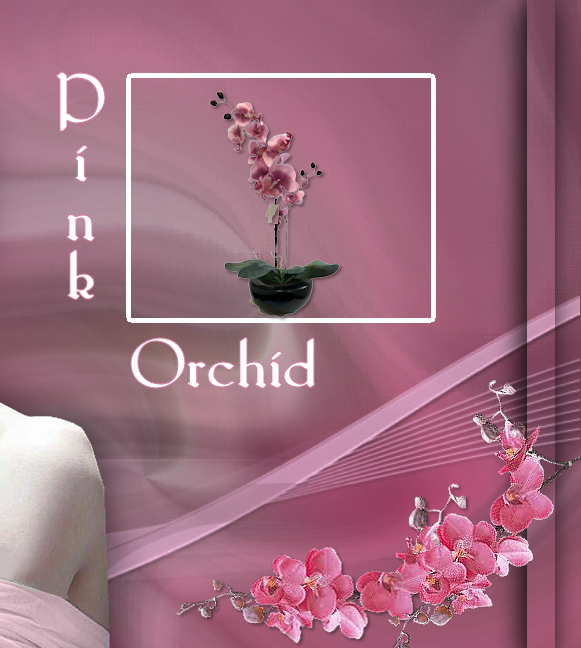
Image / Add Borders 2-pixels with #fcc4e9
Image / Add Borders 35-pixels with #760541
Use your Magic Wand and Select the 35-pixel Border.
Effects / Plugins / Filters Unlimited 2.0
It@lian Editors Effects / Effetto Fantasma
(with the following settings)

Effects / Edge Effects / Enhance More
Repeat 1 more time
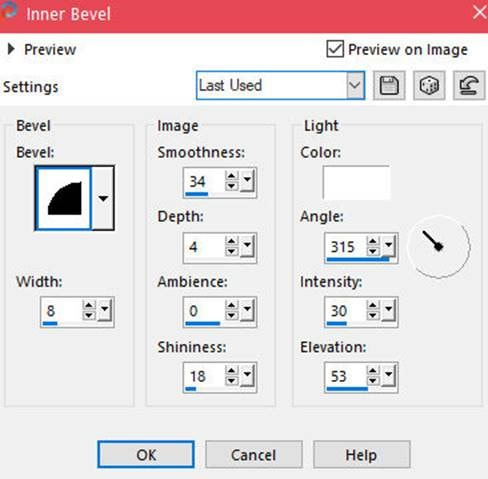
Effects / 3d Effects / Inner Bevel
(with the following settings)
Repeat 1 more time
Effects / 3d Effects / Inner Bevel
(with the following settings)
Selections / Select None
Add your name or watermark
Save as Jpg.
Pink Orchid.
*************
If you choose to Animate
Open the image in Animation Shop
Duplicate so you have 3 Layers of Pink Orchid
Open your Animation-20111013_3
Make your 3 Layers Pink Orchid Active
Edit / Select All
Choose Edit Select all, on your Animation-20111013_3
Then select again.
Edit Propagate Paste.
Gently pull animation into your Orchid in the frame.
Use your undo arrow at the top, Select Edit / Select All again,
it makes you until there are three animations this Pink Orchid.
At the top of the Orchid,
in the middle of the Orchid,
and at the bottom of the Orchid,
See the picture above.
Press File Optimization Wizard and press ok 4 times and execute.
Save your image as Pink Orchid.
Hope you enjoyed making this little Tutorial.
Aurora
February 23, 2021
©
You are very Welcome,
to send Your Version of this tutorial in other color,
and with other tubes,
and I will put it under my tutorial.
on my site,
I will provide You Credit for Your work.
Use this mail: [email protected]
Translation Dennis
